- 您現(xiàn)在的位置:買賣IC網(wǎng) > PDF目錄369878 > LX1710EVALKIT AudioMAX Products PDF資料下載
參數(shù)資料
| 型號(hào): | LX1710EVALKIT |
| 英文描述: | AudioMAX Products |
| 中文描述: | AudioMAX產(chǎn)品 |
| 文件頁(yè)數(shù): | 5/11頁(yè) |
| 文件大小: | 299K |
| 代理商: | LX1710EVALKIT |

LXE1710 / 1711 E
VALUATION
B
OARD
U
SER
G
UIDE
Microsemi
Integrated Products
11861 Western Avenue, Garden Grove, CA. 92841, 714-898-8121, Fax: 714-893-2570
Page 5
Copyright
2000
Rev. 1.3, 2002-07-09
Q
UICK
S
TART
G
UIDE
The LXE1710/1711 Evaluation Board is a fully
functional, Class-D Amplifier. Connection to a single
supply voltage (VDD from either a battery or power
supply), speakers, and your audio source is all that is
required to begin evaluating the amplifier and listening
to music. The following outlines the necessary
connections and control jumpers.
1) Verify contents of Evaluation Kit: The easy-to-
use amplifier is all contained on a single board.
Visually inspect to see if the board or any
components were damaged during shipping.
All components are located on the top side of
the PCB except for the decoupling capacitor,
C17. A copy of the LX1710/1711 Datasheet
can be downloaded from the Microsemi.com
website.
2)
supply and ground connections are made through
terminal block TB1. Connect your “+” (+7V to +15V for
the LXE1710 or +7V to +25V for the LXE1711) power
supply or battery to the +V input of TB1. Connect your
supply or battery ground to the GND input of TB1.
Please ensure the correct positive and ground
connections are made before turning on the power
supply.
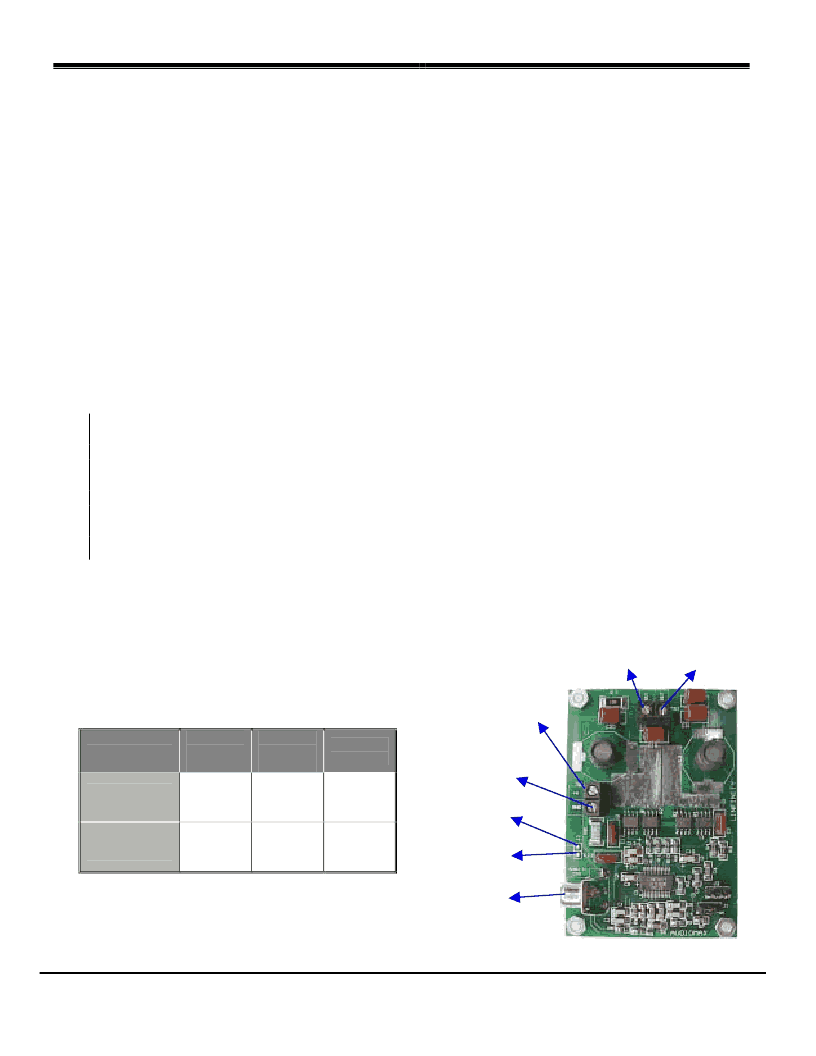
Power and Ground Connections: The voltage
3) Speaker Connection: The amplifier is designed
to drive a single 4
speaker. Connect speaker
“+” and “-“ to the +OUT and –OUT input of
terminal block TB2 respectively. The amplifier
can be used to drive other speaker loads but
frequency response may not be optimal. See
LC filter design section for recommended
inductor and capacitor modifications.
4) Audio Input Connection: Connect your audio
source to the RCA Jack CN1, Audio In. For
other type interfaces, the audio input signal can
also be connected to the amplifier board using
the J3 (In- and In+) location. Strip Line Plugs
can be inserted into J3 for connectivity.
5) Jumper Selection Controls: The “on/off” or
enable to the module is controlled with the
SLEEP/ signal. Jumper J1 connects the
SLEEP/ to “on” or “ off”. SLEEP/ is an active
Low control. Jumper J2 connects the MUTE
control which enables/disables the audio input
to the amplifier. MUTE is an active High signal.
See table below.
6) Power Source: If a power supply is being used,
make sure it is set to the correct voltage level
and turn the power supply on.
7) Audio Source: Make sure the audio source
signal is set to a minimum level. Start or “play”
audio source and adjust source volume to
desired level.
8) Listen to AudioMAX: If the amplifier is not
operating properly, verify preceding steps or
contact Linfinity for technical assistance (714)
898-8121.
To Speaker +
Jumper
toward
OFF
Amplifier
enabled
(SLEEP/ is
OFF)
Audio Input
enabled
(MUTE is
OFF)
Jumper
toward
ON
Amplifier
disabled
(SLEEP/ is
ON)
Jumper
floating
J1 Jumper:
SLEEP/
Amplifier
disabled
(SLEEP/ is
ON)
Audio Input
enabled
(MUTE is
OFF)
J2 Jumper:
MUTE
Audio Input
disabled
(MUTE is ON)
Table 1:
Jumper Settings
To Power Supply +V
7V-15V for LX1710
7V-25V for LX1711
To Speaker -
To Power Supply
Ground
Optional
Audio In -
Optional
Audio In +
To Audio
Source
相關(guān)PDF資料 |
PDF描述 |
|---|---|
| LX1711-100EVALKIT | AudioMAX Products |
| LX1711EVALKIT | AudioMAX Products |
| LX1721CDB | AudioMAX Products |
| LX1721EVALKIT | AudioMAX Products |
| LX1722-150EVALKIT | AudioMAX Products |
相關(guān)代理商/技術(shù)參數(shù) |
參數(shù)描述 |
|---|---|
| LX1711 | 制造商:MICROSEMI 制造商全稱:Microsemi Corporation 功能描述:EVALUATION KIT |
| LX1711-100EVALKIT | 制造商:未知廠家 制造商全稱:未知廠家 功能描述:AudioMAX Products |
| LX1711CDB | 制造商:MICROSEMI 制造商全稱:Microsemi Corporation 功能描述:EVALUATION KIT |
| LX1711EVALKIT | 制造商:未知廠家 制造商全稱:未知廠家 功能描述:AudioMAX Products |
| LX1720 | 制造商:MICROSEMI 制造商全稱:Microsemi Corporation 功能描述:SWITCHING CLASS-D, STEREO POWER AMPLIFIER CONTROLLER IC |
發(fā)布緊急采購(gòu),3分鐘左右您將得到回復(fù)。